Showing posts with label Hyper-V windows2008R2. Show all posts

Friday, August 26, 2011

Choosing a block size when creating VMFS datastores

When you create a VMFS datastore on your VMware ESX servers many administrators select the default 1MB block size without knowing when or why to change it. The block size determines the minimum amount of disk space that any file will take up on VMFS datastores. So an 18KB log file will actually take up 1MB of disk space (1 block) and a 1.3MB file will take up 2MB of disk space (2 blocks). But the block size also determines the maximum size that any file can be, if you select a 1MB block size on your data store the maximum file size is limited to 256GB. So when you create a VM you cannot assign it a single virtual disk greater then 256GB. There is also no way to change the block size after you set it without deleting the datastore and re-creating it, which will wipe out any data on the datastore.
Because of this you should choose your block size carefully when creating VMFS datastores. The VMFS datastores mainly contain larger virtual disk files so increasing the block size will not use all that much more disk space over the default 1MB size. You have the following choices when creating a datastore:


• 1MB block size – 256GB maximum file size
• 2MB block size – 512GB maximum file size
• 4MB block size – 1024GB maximum file size
• 8MB block size – 2048GB maximum file size


Besides having smaller files use slightly more disk space on your datastore there are no other downsides to using larger block sizes. There is no noticeable I/O performance difference by using a larger block size. When you create your datastore, make sure you choose your block size carefully. 1MB should be fine if you have a smaller datastore (less than 500GB) and never plan on using virtual disks greater then 256GB. If you have a medium (500GB – 1TB) datastore and there is a chance that you may need a VM with a larger disk then go with a 2MB or 4MB block size. For larger datastores (1TB – 2TB) go with a 4MB or 8MB block size. In most cases you will not be creating virtual disks equal to the maximum size of your datastore (2TB) so you will usually not need a 8MB block size.

 
There is no noticeable I/O performance difference by using a larger block size. When you create your datastore, make sure you choose your block size carefully. 1MB should be fine if you have a smaller datastore (less than 500GB) and never plan on using virtual disks greater then 256GB. If you have a medium (500GB – 1TB) datastore and there is a chance that you may need a VM with a larger disk then go with a 2MB or 4MB block size. For larger datastores (1TB – 2TB) go with a 4MB or 8MB block size. In most cases you will not be creating virtual disks equal to the maximum size of your datastore (2TB) so you will usually not need a 8MB block sizeVMFS Size Limitations

New Partition Tables For VMFS

Monday, November 22, 2010

System Management in VMWare


Common system
management issues in VMware Infrastructure


1003926
Troubleshooting the VMware VirtualCenter Server
service when it does not start or fails


1003895
Stopping, starting, or restarting the VirtualCenter
Server service


1003928
Troubleshooting the database data source used by VirtualCenter
Server


1003971
Determining if a port is in use


1003979
Investigating the health of a VirtualCenter
database server


1003996
Investigating Active Directory when it causes the VirtualCenter
Server to stop or fail to start


1003684 Overview
of migration compatibility error messages


1003718
Troubleshooting VMotion CPU feature requirement
error messages


1004070
Diagnosing why VirtualCenter is not sending email
alerts


1003486
Testing network connectivity with the Ping command


1003409
Diagnosing an ESX Server that is Disconnected or Not Responding in VirtualCenter


1003480 Changing
an ESX Server's connection status in VirtualCenter

1003490
Restarting the Management agents on an ESX Server


1003486
Testing network connectivity with the Ping command

1003496
Checking for resource starvation of the ESX Server service console


1003487
Testing port connectivity with the Telnet command


1003494
Verifying that the Management Service is running on an ESX host


1003495
Verifying that the VirtualCenter Agent Service is
running on an ESX host


1004002
Diagnosing slow deployment of templates or clones from VirtualCenter


1004028
Troubleshooting slow template deployment on a single template


1003496
Checking for resource starvation of the ESX Server service console


1004089
Configuring the speed and duplex of an ESX Server host network adapter


1004050 Troubleshooting
template deployment or cloning when it fails


1005593
Determining the correct version of sysprep to use


1005594 Ensuring
VirtualCenter Server is the only VMware product
installed on host


1005870
Ensuring the guest operating system type is set correctly


1003870
Diagnosing the Virtual Infrastructure Client when it fails to connect to an
ESX host


1003486
Testing network connectivity with the Ping command


1003494
Verifying that the Management Service is running on an ESX host


1003487
Testing port connectivity with the Telnet command


1003887
Troubleshooting permissions errors when connecting to an ESX Server host with
the Virtual Infrastructure client


1003869
Diagnosing the Virtual Infrastructure Client when it fails to connect to VirtualCenter


1003486
Testing network connectivity with the Ping command


1003895
Stopping, starting, or restarting the VirtualCenter
Server service


1003487
Testing port connectivity with the Telnet command


1003561
Troubleshooting the VMware ESX Server Management Service when it will not
start


1003631 Restarting
the ESX Server Management service


1003564
Investigating disk space on an ESX host


1003634
Troubleshooting the firewall policy on an ESX Server


1003496
Checking for resource starvation of the ESX Server service console


1003807 Unable
to connect to an ESX Server host using Secure Shell (SSH)


1003486
Testing network connectivity with the Ping command


1003906 Verifying
that the Secure Shell Daemon is running on an ESX Server host


8375637
Enabling Root SSH Logins on ESX Server 3


1003808
Configuring the ESX Server host firewall for SSH


1003487
Testing port connectivity with the Telnet command


1003691 Diagnosing
a VMware High Availability cluster configuration failure


1003692
Verifying a feature is licensed


1003735
Identifying issues with and setting up name resolution on ESX Server


1003713
Configuring name resolution for VMware VirtualCenter


1003486 Testing
network connectivity with the Ping command


1003714
Verifying and reinstalling the correct version of VMware VirtualCenter
Server agent


1003734
Diagnosing VMware VMotion failure at 10%


1002662
Unable to set VMkernel gateway as there are no VMkernel interfaces on the same network

1003791
VMware VMotion fails if target host does not meet
reservation requirements


1003728
Testing VMkernel network connectivity with the vmkping command

1003496
Checking for resource starvation of the ESX Server service console


1003486
Testing network connectivity with the Ping command

1003780
Troubleshooting migration compatibility error: Device is a connected device
with a remote backing


1003735
Identifying issues with and setting up name resolution on ESX Server


1003736
Verifying time synchronization across environment


1003839
Troubleshooting Virtual Machine loses network connection after VMware VMotion


1003486 Testing
network connectivity with the Ping command


1002811 Port
security on the physical switch causes a loss of network connectivity


1003792
Diagnosing VMware VMotion failure at 90-95%


1003490
Restarting the Management agents on an ESX Server


1003736
Verifying time synchronization across environment


1003791
VMware VMotion fails if target host does not meet
reservation requirements


1003496
Checking for resource starvation of the ESX Server service console


1003659
Identifying shared storage issues with ESX 3.x


Wednesday, October 13, 2010

VCENTER MIGRATION FROM 4.0 to 4.1

Hi Every One!!!!

Vcenter is used for maintaining the esx server from a centralized place with user permission and cluster creation and the licensing issues. while migration time  from 4.0 to 4.1, we need to follow these steps for getting old database which is stored in 4.0  to 4.1.

Before migration All the service of vcenter should be stop
VMware VirtualCenter Server
VMware VirtualCenter Management Webservices
VMware vCenter Update Manager Service

Mount the vcenter in the old vcenter machine and open the cd and copy the Datamigration folder to C:\Datamigration
Extract all the file in the same folder


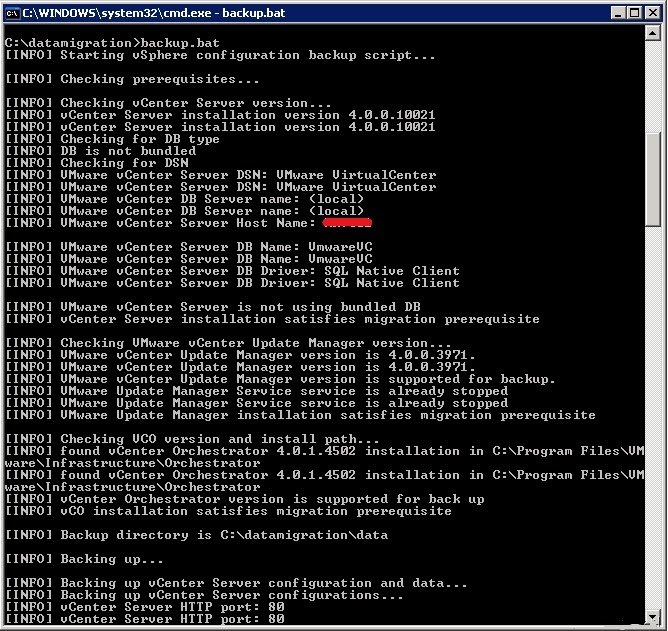
Navigate to C:\Datamigration\ and run backup.bat , the script will backup all configuration settings from your recent vCenter installation and database. (Software builds, used ports, database information, server names and VUM Settings/Patches etc.).. once finished all the important data is stored in C:\Datamigration\Data\
If there are any errors while making the backup… check this and fix before you go further!
Now you need to copy the C:\Databasemigration\ folder to your new planned vCenter 4.1 server. You can do this by share, copy this on USB stick or whatever.

Migrate the database and install vCenter 4.1:
- Login to the new vCenter server;
- Mount the new
VMware vCenter Server 4.1 and modules
Open CMD:
- Navigate to C:\Data migration\ and run install.bat. The script will check if the correct data is present..
If you used a different name for your new vCenter server press Yes.. to continue
Then you must select the vCenter 4.1 and VUM installation source. In my case the mounted ISO has driveletter F:\
The configuration will be validated, correct ports numbers, vCenter serial number etc.. all good..
.. The vCenter Installation is started

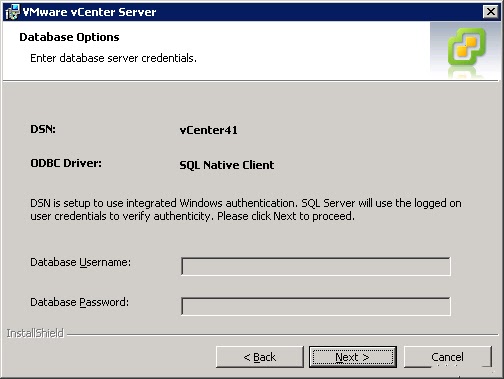
I already installed a Microsoft SQL 2005 Enterprise server (local) and created a 32 bit ODBC connection, THEN select “vCenter41” DSN
If needed, give the correct credentials

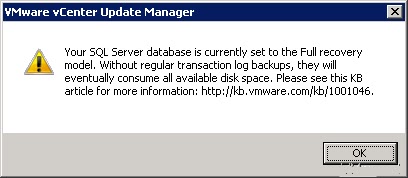
You can modify this later, please check: http://kb.vmware.com/kb/1001046 for more information


- I changed the installation path to D:\Program Files\VMware\Infrastructure\ .. default location is C:\..\.


Oke, the installation was not so difficult. After clicking finish the install.bat will continue with the VMware Update Manager database migration and installation.
VMware Update Manager – Database migration and installation software:
As you can see “vCenter Server migration installed completed successfully” great
The install.bat script will continue and check again if the selected VUM ports are available and if the copied data migratable is for the new VUM database location


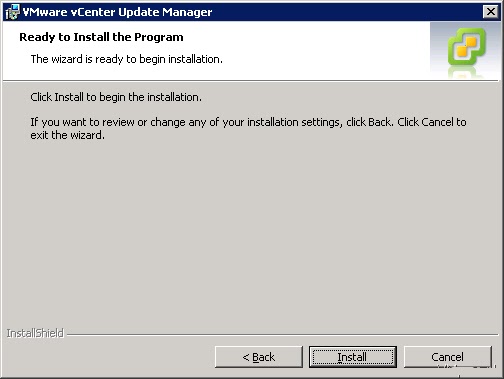
 For VMware Update Manager you need to create a 64-Bit DSN. You can create this here: C:\WINDOWS\SysWOW64\odbcad32.exe .. oke, thats done.. select the VUM (already created before installation) database.


The installation and patch download location is by default C:\.. I prefer to install this data on a separate disk.. so I changed the installation path to D:\…\.. 


Now you can connect your vCenter server and manage your hosts and VM’s.. sometimes you can’t!
Tip before connect the vCenter:

- Reboot your new vCenter 4.1 server;

- On the ESX host: Restart your management services: service mgmt-vmware restart
- On the ESX host: Use a text editor to view/change the IP address inside the xxx.xxx.xxx.xxx tags the following file:/etc/opt/vmware/vpxa/vpxa.cfg
Finally result:


Successful migration process  of vCenter 4.0 to new 4.1 server
I Hope Every Body Enjoyed .Problem has been solved !!!!!!!!!!!!!!!!!!!!!!!!!!!


Sunday, September 05, 2010

How-to-change-ip-address-of-the-esx-server-console

Hi
This below content is used for shifting one esx server to another esx server in different networks, for connecting esx server , we required a console for graphic user interface , i hope if u follow this for  connecting esx server thru vsphere client....
There is a time when you need to change the IP address your ESX host. You can’t do it in the VI client Graphical User Interface. The only thing you can do is to go to the ESX server console.
1.) First of all , you must have physical access to the console.
2.) Put your ESX host in Maintenance Mode and disconnect it from Virtual Center.
3.) Now you can connect to the console of your ESX host.
4.) Remove the old IP address (by deleting the vswif interface) “esxcfg-vswif -d vswif0″ (vsfif0 is your interface to remove. Otherwise use the number you need)
5.) Create a new vswif interface with the New IP address “esxcfg-vswif -a vswif0 -p “Service Console” -i 192.168.0.100 -n 255.255.255.0 -b 192.168.0.255″ (vsfif0 is your interface you work with. Otherwise use the number you need). If you need, replace Service Console with the name of your Service Console portgroup (this one is the default value)
-i is the new IP address
-n is your new subnet
-b is your broadcast
6.) Update the default gateway. Open nano “nano /etc/sysconfig/network file”
Press “CTRL+O” and “ENTER” then “CTRL+Q” to quit
7.) Then you need to restart the interface. Do a “esxcfg-vswif -s vswif0″ (this will disable the vswif0 interface) and “esxcfg-vswif -e vswif0″ (this will enable the vswif0 interface)
8.) You should now update update DNS and your HOSTS files. Also what I would do is a “ipconfig /flushdns” and “ipconfig /registerdns” on your Virtual Center server. Only after you should reconect your ESX server host in the Virtual Center.
You can change the DNS information, hostname from the VI client GUI:
01.) Open the VI client and highlight the ESX Server host and click on the Configuration tab.
02.) Click DNS and Routing.
03.) Click Properties.
04.) If you want to change the hostname, domain, and DNS servers, click the DNS Configuration tab and enter the appropriate values.
05.) To change the default gateway, click the Routing tab and enter the appropriate values.


06.) Then you can restart the ESX server from the GUI interface of your VI client for the changes to take an effect
So after the reboot you get this : (I just changed my DNS info from “vladanseget.com” to “vladan.fr” … as an example
Please send a comment .....Satishchirala@gmail.com

Wednesday, August 11, 2010

Windows 2003 and 2008 Server

Hi
There are major changes in windows 2003 & 2008 Server with new features,i  am expecting this would help for you ...... 


Windows 2003 Server
Windows 2008 Server
RIS
WDS-Windows Deployment Services
IIS 6.0
IIS 7.0
DFS
Changes in DFS
4-Primary Partitions
3-Primary Partitions
No Shrinking Volumes
Shrinking Volumes
No network discovery service
Network Discovery service
No RODC
RODC
No in built GPMC
Inbuilt GPMC
windows NT Backup
windows server Backup
No windows server core
windows server core
Terminal Service-RDP 5.2
Improved Terminal Services-RDP 6.0
DNS
Improved DNS

1. 32 / 64 Bit Operating system.
2. Built on NT Technology
3. Inbuilt Terminal Services
4. No Primary Domain controller and Backup Domain Controller
5. Transitive trust relationship automatically created
6. Active Directory
7. Secondary Logon Services
8. Improved Security – Kerberos Version5
9. Distributed File System (DFS)
10. Freedom from drive letters
11. Centralized deployment of applications
12. Only DNS required no need for WINS
13. Remote Installation service
14. Supports FAT 16, Fat 32, NTFS and EFS
15. Internet Information services (IIS)
16. Volume shadow copy
17. Quality of service
18. Disk Quotas

1. 32 / 64 Bit Operating system.
2. Server Manager
3. Active Directory
  -- Domain Services
 -- Federation Services
 -- Lightweight Directory Services
 -- Rights Management Services
 -- Read-only Domain Controller
4. In-built GPMC
5. Centralized deployment of applications
6. Disk Quotas
7. Distributed File System (DFS)
8. Windows Server Backup
9. DNS Dependency
10. Internet Information services (IIS)
11. Improved Terminal Services
      --Ts web Access Administration
      --Ts Remote App
      --Ts Gateway
12. Windows Deployment Services
13. Support FAT16, FAT32, NTFS
14. Windows Server Core
15. Volume Shadow Copy
16. Network Access Protection
17. Virtualization
18. Windows Power Shell
19. Improved Security
     -- Kerberos Version5
     -- Internet Protocol Security
     -- Support for smart card

please update me if there is any problems via comments or to my mail id :satishchirala@gmail.com

Sunday, June 27, 2010

error 28035 %windir%\adam

HI

After a long time , i got solution for this error resolving in windows 7, i had seen many blog about this issue


please download this file http://download.microsoft.com/download/7/3/9/73982B95-A8C9-4B6C-BD85-6EC620BB0A7A/Windows6.1-KB975541-x86.msu


I hope this will solve your problem

:::::::::::::::::::::::::::::::::::::::::::::::::::::::::::::::::::::::::::::

Wednesday, June 09, 2010

SNMP CONFIGURATION

Me And My Friend Had worked on SNMP In VMware It's working .....
Enabling SNMP access and trap forwarding for VMware
IBM® Director 5.10.3 supports SNMP access and trap forwarding on VMware ESX Server, and will inter-operate with the ucd-snmp versions that ship with VMware ESX Server version 2.5.2 and 3.0.

These instructions apply only to using IBM Director SNMP support on VMware ESX Server.
Complete the following steps to enable SNMP access and trap forwarding for managed systems running VMware:
Download the net-snmp-5.2.1.tar.gz file from the Net-SNMP Web site at www.net-snmp.org/download.html.
Build and install the Net-SNMP libraries using the following steps.
Notes:
This procedure does not perform a full installation of Net-SNMP, but installs only the Net-SNMP libraries, which are required for IBM Director Core Services SNMP functions.
Refer to the INSTALL and README files included in the net-snmp-5.2.1.tar.gz package for additional installation information.
Untar the source files. Type the following command and press Enter.
tar -xvzf net-snmp-5.2.1.tar.gzChange to the source directory. Type the following command and press Enter.
cd net-snmp-5.2.1Build the Net-SNMP libraries with default options. Type the following commands (press Enter after each).
./configure --with-defaults
makeInstall the Net-SNMP libraries only to /usr/local/lib. Type the following command and press Enter.
make installlibsTo enable trap forwarding, edit the /etc/init.d/dacimlist file and uncomment the following two lines two lines in the SNMP End Consumer section.
LD_LIBRARY_PATH=/usr/local/lib
export LD_LIBRARY_PATHNote: The configuration changes will not take effect until you restart the cimlistener daemon in step 7.
To enable SNMP access, edit the /etc/init.d/dasnmp file and uncomment the following two lines in the section regarding the location of the net-snmp libraries.


LD_LIBRARY_PATH=/usr/local/lib


export LD_LIBRARY_PATHConfigure the SNMP daemon that ships with VMware to support AgentX agents. For details, see the VMware documentation at www.vmware.com/support/pubs/esx_pubs.html.


Create the file /usr/local/share/snmp/snmpd.conf to specify trapsink and trapcommunity settings. You might have to create the directory. This file should contain only settings for trapcommunity and trapsink.
 Specify a trap community value by adding a line containing the word trapcommunity followed by a space and the trapcommunity value, as in the following example.
trapcommunity publicSpecify a trapsink value for each destination to which IBM Director will send SNMP traps. Add a line containing the word trapsink followed by a space and the trapsink value, as in the following example.
trapsink 192.168.1.1Restart the cimlistener daemon by typing the following commands and pressing Enter after each:
/etc/init.d/dacimlist stop
/etc/init.d/dacimlist startRestart the IBM Director AgentX subagent by typing the following commands and pressing Enter after each:
/etc/init.d/dasnmp stop
/etc/init.d/dasnmp start

Tuesday, April 13, 2010

VMWARE ESX (VMDK) for VHD Convertor

After a Long search in google i found the tool starwind software convertor, Which is used for converting VMDK files to VHD files ....

acm bottom ad